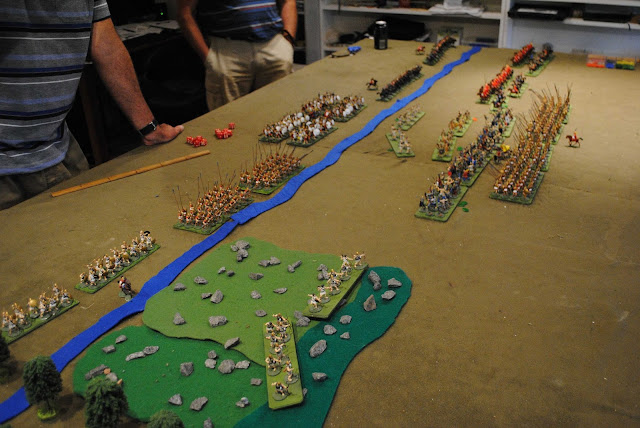
Jim, with help of his ally Mark is attacking Mike at Paeonia in attempt to win back the province lost in a surprise attack some years back. Mike is slightly outnumbered and has chosen a position behind a river.
Mike is on the left with his 2 cavalry divisions on his left, hoplite phalanxes in the centre & a mix of phalanx & light troops on his right.
Mark's cavalry division is on the far right of the allied line. Jim's phalanx is his centre with warbands on his left & his cavalry on his right.
Mike has the advantage in missile power having 2 bows, 2 slings, 2 light infantry & 4 light cavalry units compared with 2 javelins, 4 warbands & 4 light cavalry.
Renfrey assisted Mike with plastic pushing the cavalry & throwing sixes. Chris umpired.
Mike has covered the river frontage with his close order troops & sent his skirmishers across the river. The allied cavalry has advanced to pinning distance from the river and Jim's arbands have been moved towards the centre in front of the phalanx.
On the far flank the allied had advanced their light cavalry as skirmishers, but they were driven back by enemy fire.
In the centre Mike took the bait of the warbands hung out in front and crossed the river with his infantry to attack them.
On the far flank Mark's attempt to renew the light cavalry skirmisher fight resulted in a blunder - his light cavalry charged over the river at the enemy heavy cavalry ans was immediately destroyed. In the centre one warband beat one of the hoplite phalanxes but another is in trouble. An attempt to hit the winning hoplites in flank with cavalry fell one command pip short.
The cavalry is still either throwing javelins or just looking across the river at their opponents. The hoplites broke the warband & rallied back before the cavalry could hit their flank. The victorious warband was withdrawn to let the phalanxes get into the action.
The hoplites have been driven back over the river by the RH phalanx. Jim's phalanx with some help from the cavalry unit have broken half Mike's right flank division.
On the far flank Jim's light cavalry has been broken by javelin fire across the river, but the allies still have 6 heavy cavalry on the flank v. 4 heavy & 4 light & no one was keen to cross the river.
In the centre two phalanxes are pressing the hoplites at the river line supported by warbands.
Left of centre Jim's cavalry lead by himself right behind has crossed the river in the gap.
On the near flank a phalanx has been broken by bow fire & a warband is left as a pin cushion to protect the next phalanx.
After a lot of frustration, the allies finally got some good dice - the cavalry in the centre charged & took out a light infantry unit to break Mike's right & the phalanx broke the hoplites in the centre and suddenly it was all over. Mike's cavalry withdrew in good order.
It was long hard fought & very entertaining battle. Having failed to find a weak spot to attack the river line, the allies resorted to hanging out a flank to entice the enemy over the river. Mike lost patience and took the bait. The allied counterattack with their phalanx & a bit of cavalry was then decisive.
Tuesday, December 27, 2016
Subscribe to:
Post Comments (Atom)


No comments:
Post a Comment